지난 10월 말 Next.js v13이 나오고 현재 13.1.1 버전까지 업데이트 되었다.
이 글에서는 Next.js 13 버전에서 바뀐 주요 기능들에 대해 정리해보고자 한다.
Turbopack
Next.js 13 버전부터는 비록 알파 버전이긴 하지만 Turbopack을 지원한다.
Turbopack은 Rust 기반으로 기존 Webpack보다 700배나 빠른 업데이트 속도를 보인다.
지난 글에서 Vite에 대해 알아보며, 기존 CRA에서 제공되는 웹팩을 사용했을 때 보다 더 빠르다는 것을 알아봤다.
그런데 Turbopack은 이 Vite보다도 업데이트 속도가 10배 더 빠르다고 한다.
그러나 현재는 alpha 버전이며 produciton 에서 사용하기에는 무리가 있으며, next dev는 지원하지만 next build는 아직 개발 진행중이다.
만약 dev 환경에서 테스트해보고 싶다면 `package.json`의 dev scripts를 `next dev --turbo`를 실행하면 된다.
App 디렉토리
기존의 next에서는 pages 디렉토리를 사용해 라우팅을 처리했다.
Next 13 버전에서는 app 디렉토리를 사용한 새로운 라우팅과 레이아웃 방식을 소개한다.
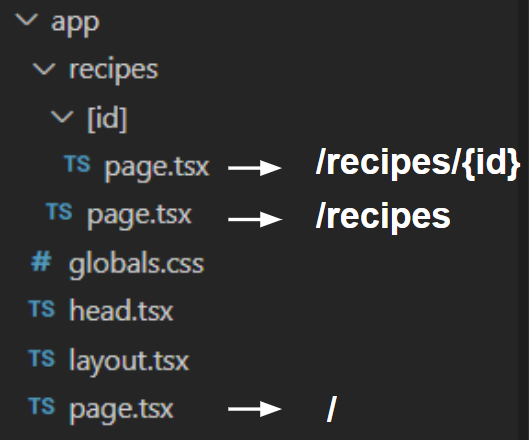
예를 들어 Main 페이지(/), 레시피 리스트 페이지(/recipes), 각 레시피 페이지 (/recipes/{id}) 를 만든다고 가정하자.
그렇다면 app 디렉토리를 사용한 파일 구조는 아래와 같다.
그렇다면 왜 이런 구조를 가지는 걸까?
예를 들어 dashboard와 관련된 파일들을 폴더로 하나로 묶고 싶지만 app 디렉토리(이전 버전에서는 pages 디렉토리) 하위의 모든 폴더/파일 이름이 라우팅 되길 원하지 않을 때를 생각해보자.
기존에는 pages 디렉토리 외부에 components 같은 디렉토리를 생성해 관리했는데, app 디렉토리에서는 내부에서 관련 파일끼리 정리하기 편리해졌다.

위에서 보다시피 page.js 파일에 대해서만 라우트가 생성되고 Navbar 등에 대해서는 생성되지 않으며,
dashboard와 연관된 Navbar 파일들도 한 디렉토리에서 관리할 수 있다.

위와 같이 마케팅과 shop에 대해 라우트를 정리하고 싶은데 URL path에는 영향을 미치지 않으려면 폴더 이름을 `(디렉토리 이름)` 으로 만들면 된다.
Dynamic 라우트 파라미터는 이전 버전과 같다. (더 보기)
고유한 역할을 수행하는 특정 파일 이름들
새로운 app 디렉토리에서는 라우터에서 사용할 수 있는 특정 파일 이름들이 있다.
- page.js : 라우트 고유의 UI를 정의하고 path를 만드는 데 사용된다.
예를 들어 app/recipes/page.js 는 /recipes 라우트를 생성한다.
export default function RecipesPage() {
  return (
    <div>
      <h1>Recipes</h1>
    </div>
  )
}
- layout.js : 여러 페이지에 공유되는 UI를 정의할 수 있다. layout을 포함한 폴더와 하위 폴더에 대해서 사용할 수 있다.
export default function DashboardLayout({
  children, // will be a page or nested layout
}: {
  children: React.ReactNode,
}) {
  return (
    <section>
      {/* Include shared UI here e.g. a header or sidebar */}
      <nav></nav>

      {children}
    </section>
  );
}

// 출처: https://beta.nextjs.org/docs/routing/pages-and-layouts#layouts
- loading.js : 컴포넌트가 준비되지 않은 loading 상태에서 보여줄 loading UI를 정의할 수 있다.
export default function Loading() {
  return <h1>Loading...</h1>
}
- error.js : 에러가 발생했을 때 UI를 정의할 수 있다.
'use client';

import { useEffect } from 'react';

export default function Error({
  error,
  reset,
}: {
  error: Error;
  reset: () => void;
}) {
  useEffect(() => {
    // Log the error to an error reporting service
    console.error(error);
  }, [error]);

  return (
    <div>
      <p>Something went wrong!</p>
      <button onClick={() => reset()}>Reset error boundary</button>
    </div>
  );
}

// 출처 : https://beta.nextjs.org/docs/routing/error-handling
- template.js : layout과 비슷하지만 컴포넌트의 새로운 인스턴스가 마운트되고 state가 공유되지 않는다.
export default function Template({ children }: {
  children: React.ReactNode
}) {
  return <div>{children}</div>;
}

// 출처 : https://beta.nextjs.org/docs/routing/pages-and-layouts#templates
- head.js : 해당 라우터의 <head> 태그 내용을 정의할 수 있다.
// app/post/[slug]/head.tsx

async function getPost(slug) {
  const res = await fetch('...');
  return res.json();
}

export default async function Head({ params }) {
  const post = await getPost(params.slug);

  return (
    <>
      <title>{post.title}</title>
    </>
  )
}

// 출처 : https://beta.nextjs.org/docs/routing/pages-and-layouts#modifying-head
- not-found.js : notFound 함수를 발생할 때 렌더링할 UI를 정의할 수 있다.
export default function NotFound() {
  return "Couldn't find requested resource"
}
더 자세한 내용은 공식 문서에서 확인할 수 있다.
서버 컴포넌트 / 클라이언트 컴포넌트
app 디렉토리 내의 모든 컴포넌트는 디폴트로 서버 컴포넌트이다.
(서버 컴포넌트와 클라이언트 컴포넌트 차이를 더 자세히 알기 위해서는 이 공식 문서 참고)
간략하게 설명하자면 데이터를 fetch하거나 백엔드 리소스에 접근하는 컴포넌트는 서버 컴포넌트고,
프론트엔드 단에서 보이고, 브라우저에서 동작되거나, 리액트 컴포넌트라면 클라이언트 컴포넌트다.

Next 13부터는 컴포넌트가 디폴트로 서버 컴포넌트 이므로, 클라이언트 컴포넌트를 정의하고 싶으면 파일 맨 위에 'use client'를 추가해주면 된다.
'use client';

import { useState } from 'react';

export default function Counter() {
  const [count, setCount] = useState(0);

  return (
    <div>
      <p>You clicked {count} times</p>
      <button onClick={() => setCount(count + 1)}>Click me</button>
    </div>
  );
}

// 출처 : https://beta.nextjs.org/docs/rendering/server-and-client-components#convention
Streaming & Suspense
이제 loading UI와 Streaming, Suspense를 사용해 점진적으로 페이지를 렌더링하고,
나머지 콘텐츠를 로딩하는 동안 먼저 로딩되는 결과를 사용자에게 보여줄 수 있다.
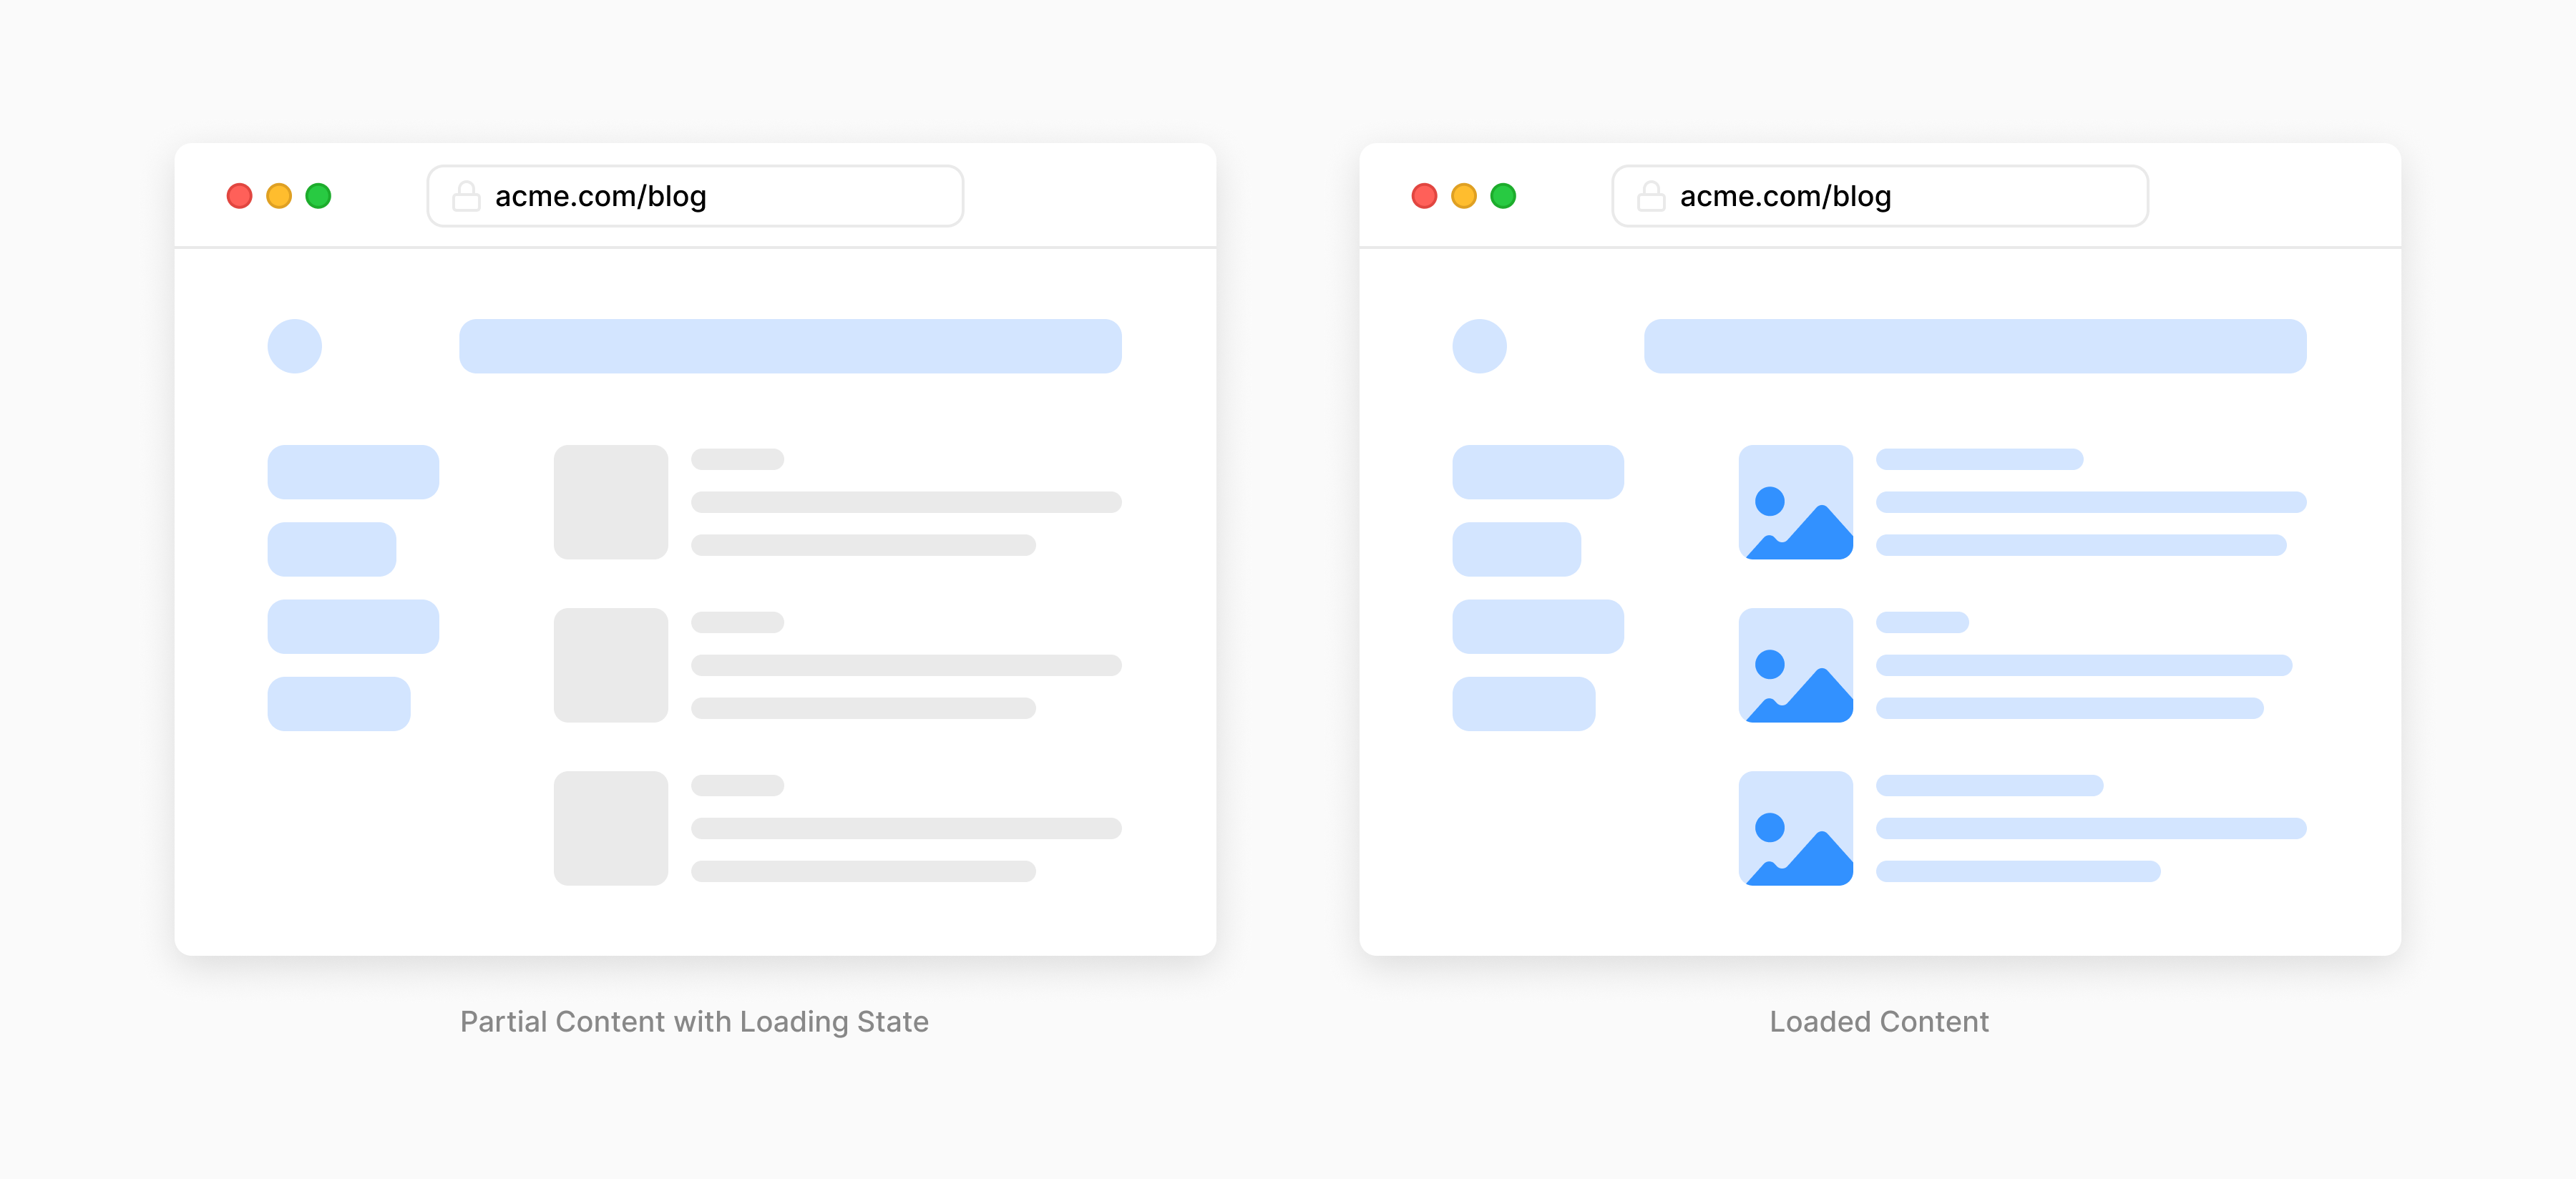
즉 페이지를 로딩할 때 모든 페이지가 로딩될 때 까지 기다리는 것이 아니라,
데이터가 필요없는 부분은 즉시 렌더링하고, 데이터를 불러오는 중인 부분은 loading UI를 보여주는 등 좀 더 매끄러운 유저 경험을 만들 수 있다.
Data fetching
기존 Next에서는 data를 fetch 하기 위해 getServerSideProps (SSR), getStaticProps(SSG), getStaticProps(ISR) 등을 사용했다.
그런데 이제 fetch API 만을사용해 기존의 SSR, SSG, ISR 등의 기능을 모두 구현할 수 있다.
// app/page.js
async function getData() {
  const res = await fetch('https://api.example.com/...');
  // The return value is *not* serialized
  // You can return Date, Map, Set, etc.
  return res.json();
}

// This is an async Server Component
export default async function Page() {
  const data = await getData();

  return <main>{/* ... */}</main>;
}

// 출처 : https://nextjs.org/blog/next-13#server-components
// This request should be cached until manually invalidated.
// Similar to `getStaticProps`.
// `force-cache` is the default and can be omitted.
fetch(URL, { cache: 'force-cache' });
// This request should be refetched on every request.
// Similar to `getServerSideProps`.
fetch(URL, { cache: 'no-store' });
// This request should be cached with a lifetime of 10 seconds.
// Similar to `getStaticProps` with the `revalidate` option.
fetch(URL, { next: { revalidate: 10 } });
// 출처 : https://nextjs.org/blog/next-13#server-components
그 외에도 next/image와 next/link 등에 변화가 있었는데, 해당 내용은 다음 글에서 알아보겠다.
출처
'개발 > 프론트엔드 (JS & React)' 카테고리의 다른 글
| React Beautiful DND (리액트 드래그 앤 드롭) 타입스크립트로 구현하기, 리액트 18 버전 Strict Mode 오류 해결 방법 (0) | 2023.01.11 |
|---|---|
| [React] CRA로 생성한 프로젝트 Vite로 마이그레이션하기 (타입스크립트) (1) | 2022.11.16 |
| [React] 리액트 프로젝트 생성 - Create React App 보다 더 빠른 Vite 사용하기 (0) | 2022.11.15 |
| [Redux Toolkit] 3 - 리덕스 툴킷에서 타입스크립트 사용하기 (0) | 2022.11.14 |
| [Redux toolkit] 2 - Slice, Reducer, Action, Thunk란? (0) | 2022.11.11 |